从零开始搭建 k8s 集群环境系列笔记:
- 从零开始搭建 k8s 集群环境 (一)—— 搭建镜像存储服和镜像服
- 从零开始搭建 k8s 集群环境 (二)—— 构建 Kubernetes 安装包
- 从零开始搭建 k8s 集群环境 (三)—— 搭建 Master 节点
- 从零开始搭建 k8s 集群环境 (四)—— 添加 Node 节点
- 从零开始搭建 k8s 集群环境 (五)—— 安装 Pod 网络
- 从零开始搭建 k8s 集群环境 (六)—— 部署 Dashboard UI
- 从零开始搭建 k8s 集群环境 (七)—— 部署 Ingress 服务
- 从零开始搭建 k8s 集群环境 (番外)—— 纯手动部署全套
经过一夜的休整,整个人又活力满满呢哈哈!
那么,今天就正式开始搭建 k8s 集群环境。先从 Master 节点开始,了解的朋友应该知道,Master 节点搭建因为要下载 Google 的镜像,对于这么这种只有小水管的用户,压力很大啊!不过今天演示我们不使用小水管,ok,看我骚操作
环境说明:
- Master:VBox虚拟机/Centos_7.5-1804/192.168.56.100
- Images:VBox虚拟机/Centos_7.5-1804/192.168.56.101
- Node01:VBox虚拟机/Centos_7.5-1804/192.168.56.102
软件环境说明:
- docker-ce-17.03.2
- kubernetes-v1.9.0
- harbor-v1.4.0
这里依旧使用 Master 机器(这不废话吗)。
一、环境准备
1.关闭交换分区
因为 SWAP 的存在影响 k8s 性能,所以 k8s 默认需要关闭.当然为了一些节省资源的场景,比如运行容器数量较多,可添加 kubelet 参数 --fail-swap-on=false 来解决。
1.暂时关闭SWAP,重启后恢复
swapoff -a
2.永久关闭SWAP
vim /etc/fstab

# 注释掉SWAP分区项,即可
# swap was on /dev/sda11 during installation
# UUID=0a55fdb5-a9d8-4215-80f7-f42f75644f69 none  swap    sw      0       0
2.Docker & Docker仓库镜像
k8s 组件都是运行在 Docker 容器中的,肯定是需要 Docker 的。
Docker 使用离线版 docker-ce-17.03.2.ce-1.el7.centos.x86_64.rpm
下载地址: https://download.docker.com/linux/centos/7/x86_64/stable/Packages/
wget https://download.docker.com/linux/centos/7/x86_64/stable/Packages/docker-ce-17.03.2.ce-1.el7.centos.x86_64.rpm
wget https://download.docker.com/linux/centos/7/x86_64/stable/Packages/docker-ce-selinux-17.03.2.ce-1.el7.centos.noarch.rpm

# 将安装 Docker 和依赖包
yum install -y docker-ce-*.rpm

# 开机启动
[root@localhost ~]# systemctl enable docker
Created symlink from /etc/systemd/system/multi-user.target.wants/docker.service to /usr/lib/systemd/system/docker.service.

# 启动 docker 服务
[root@localhost ~]# systemctl restart docker
启动起来再看下版本:
# 查看 docker 版本
[root@localhost ~]# docker version
Client:
 Version:      17.03.2-ce
 API version:  1.27
 Go version:   go1.7.5
 Git commit:   f5ec1e2
 Built:        Tue Jun 27 02:21:36 2017
 OS/Arch:      linux/amd64

Server:
 Version:      17.03.2-ce
 API version:  1.27 (minimum version 1.12)
 Go version:   go1.7.5
 Git commit:   f5ec1e2
 Built:        Tue Jun 27 02:21:36 2017
 OS/Arch:      linux/amd64
 Experimental: false
然后就是镜像,虽然k8s需要的组件是从 gcr.io 服务器拉取的,但是集群创建好之后需要的的镜像并不一定~ 所以就按需配置吧~
这里推荐阿里云的,点击查看点击查看点击查看
3.kubeadm、kubectl、kubelet、kubernetes-cni
昨晚辛苦辛苦搞的就是这些。在上一篇文章中已经编译且安装了,这里就略过了。
看下版本:
[root@localhost ~]# kubeadm version
kubeadm version: &version.Info{Major:"1", Minor:"9", GitVersion:"v1.9.0", GitCommit:"925c127ec6b946659ad0fd596fa959be43f0cc05", GitTreeState:"clean", BuildDate:"2017-12-15T20:55:30Z", GoVersion:"go1.9.2", Compiler:"gc", Platform:"linux/amd64"}

[root@localhost ~]# kubectl version
Client Version: version.Info{Major:"1", Minor:"9", GitVersion:"v1.9.0", GitCommit:"925c127ec6b946659ad0fd596fa959be43f0cc05", GitTreeState:"clean", BuildDate:"2017-12-15T21:07:38Z", GoVersion:"go1.9.2", Compiler:"gc", Platform:"linux/amd64"}
The connection to the server localhost:8080 was refused - did you specify the right host or port?
# 额本机的k8s的api服务还没启动,只显示了客户端的信息
另外,如果不自己去编译也可以使用其他 yum 源来安装,比如阿里云里面的版本就很全…
[root@localhost ~]# cat <<EOF > /etc/yum.repos.d/kubernetes.repo
[kubernetes]
name=Kubernetes
baseurl=http://mirrors.aliyun.com/kubernetes/yum/repos/kubernetes-el7-x86_64
enabled=1
gpgcheck=0
repo_gpgcheck=0
gpgkey=http://mirrors.aliyun.com/kubernetes/yum/doc/yum-key.gpg
       http://mirrors.aliyun.com/kubernetes/yum/doc/rpm-package-key.gpg
EOF

# 更新缓存
[root@localhost ~]# yum makecache

# 使用yum安装
[root@localhost ~]# yum install -y kubeadm kubectl kubelet
启动 kubelet 服务,并设置开机启动
[root@localhost ~]# systemctl restart kubelet
[root@localhost ~]# systemctl enable kubelet
Created symlink from /etc/systemd/system/multi-user.target.wants/kubelet.service to /etc/systemd/system/kubelet.service.
4.关闭防火墙
实际操作发现开着防火墙会出一系列问题,所以还是关掉!
service iptables stop
service firewalld stop

# 取消开机启动
systemctl disable iptables
systemctl disable firewalld
二、加载k8s组件镜像
- 注意:此步骤非常关键,
kubenetes初始化启动会依赖这些镜像,天朝的网络肯定是拉不下来google的镜像的,一般人过了上一关,这一关未必过的去,一定要提前把镜像下载到本地,kubeadm安装才会继续,下面我会列出来master节点和node依赖的镜像列表。(备注:考虑到随着kubernetes版本一直更新,镜像也可能会有变化,大家可以先执行kubeadm init生成配置文件,日志输出到[apiclient] Created API client, waiting for the control plane to become ready这一行就会卡住不动了,你可以直接执行ctrl + c中止命令执行,然后查看ls -ltr /etc/kubernetes/manifests/中yaml文件列表,每个文件都会写着镜像的地址和版本)
在这里我提一个可以解决下载google镜像的方法,就是买一台可以下载的机器,安装代理软件,在需要下载google镜像的机器的docker设置HTTP_PROXY配置项,配置好自己的服务代理即可(也可以直接买可以访问到google的服务器安装).
1.找到镜像名称
先执行一次初始化命令
[root@localhost ~]# kubeadm init
[init] Using Kubernetes version: v1.9.8
[init] Using Authorization modes: [Node RBAC]
[preflight] Running pre-flight checks.
	[WARNING Hostname]: hostname "localhost.master" could not be reached
	[WARNING Hostname]: hostname "localhost.master" lookup localhost.master on 8.8.8.8:53: no such host
	[WARNING Firewalld]: firewalld is active, please ensure ports [6443 10250] are open or your cluster may not function correctly
	[WARNING FileExisting-crictl]: crictl not found in system path
[certificates] Generated ca certificate and key.
[certificates] Generated apiserver certificate and key.
[certificates] apiserver serving cert is signed for DNS names [localhost.master kubernetes kubernetes.default kubernetes.default.svc kubernetes.default.svc.cluster.local] and IPs [10.96.0.1 10.0.2.15]
[certificates] Generated apiserver-kubelet-client certificate and key.
[certificates] Generated sa key and public key.
[certificates] Generated front-proxy-ca certificate and key.
[certificates] Generated front-proxy-client certificate and key.
[certificates] Valid certificates and keys now exist in "/etc/kubernetes/pki"
[kubeconfig] Wrote KubeConfig file to disk: "admin.conf"
[kubeconfig] Wrote KubeConfig file to disk: "kubelet.conf"
[kubeconfig] Wrote KubeConfig file to disk: "controller-manager.conf"
[kubeconfig] Wrote KubeConfig file to disk: "scheduler.conf"
[controlplane] Wrote Static Pod manifest for component kube-apiserver to "/etc/kubernetes/manifests/kube-apiserver.yaml"
[controlplane] Wrote Static Pod manifest for component kube-controller-manager to "/etc/kubernetes/manifests/kube-controller-manager.yaml"
[controlplane] Wrote Static Pod manifest for component kube-scheduler to "/etc/kubernetes/manifests/kube-scheduler.yaml"
[etcd] Wrote Static Pod manifest for a local etcd instance to "/etc/kubernetes/manifests/etcd.yaml"
[init] Waiting for the kubelet to boot up the control plane as Static Pods from directory "/etc/kubernetes/manifests".
[init] This might take a minute or longer if the control plane images have to be pulled.
成功的卡在了 pull 镜像的位置,我们 Ctrl + C 结束命令,查看一下文件列表:
[root@localhost ~]# ll /etc/kubernetes/manifests/
总用量 16
-rwx------. 1 root root  876 5月  20 12:23 etcd.yaml
-rwx------. 1 root root 2545 5月  20 12:23 kube-apiserver.yaml
-rwx------. 1 root root 2002 5月  20 12:23 kube-controller-manager.yaml
-rwx------. 1 root root  991 5月  20 12:23 kube-scheduler.yaml
找出需要的镜像:
[root@localhost ~]# cat /etc/kubernetes/manifests/* |grep image
    image: gcr.io/google_containers/etcd-amd64:3.1.10
    image: gcr.io/google_containers/kube-apiserver-amd64:v1.9.8
    image: gcr.io/google_containers/kube-controller-manager-amd64:v1.9.8
    image: gcr.io/google_containers/kube-scheduler-amd64:v1.9.8
除了上面四个之外,还需要一个(别问我怎么知道了,说多了都是泪)
gcr.io/google_containers/pause-amd64:3.0
gcr.io/google_containers/kube-proxy-amd64:v1.9.8
2.拿到镜像
由于 gcr.io 实际上是 Google 公司的域名,所以如果要在国内拿到 k8s 镜像下载,主要有四个方法:
- 1.科学上网
- 2.找国内现成的镜像
- 3.使用第三方自动构建服务
科学上网
如果你有一个可以科学上网的 VPN/SS 之类的账户,那么你只要对系统配置网络,让系统能访问上 gcr.io 就可以了,很简单,掏钱就行(充钱能让你的服务变快~!)。
或者你有一台可以访问 gcr.io 的服务器,那么你也可以用它装一个 Docker 然后 pull 下你需要的镜像,然后通过 save 打包传回国内再 load 进目标机器。
docker pull gcr.io/google_containers/pause-amd64:3.0
docker pull gcr.io/google_containers/etcd-amd64:3.1.10
docker pull gcr.io/google_containers/kube-proxy-amd64:v1.9.8
docker pull gcr.io/google_containers/kube-apiserver-amd64:v1.9.8
docker pull gcr.io/google_containers/kube-scheduler-amd64:v1.9.8
docker pull gcr.io/google_containers/kube-controller-manager-amd64:v1.9.8

docker save {id} -o file.tar {tag}
docker load <file.tar
找国内现成的镜像
这个方法,怎么说呢,看运气了如果你使用某些博客提供的全套方案和二进制,那么也许可行。反正我是不会这么做的,知其然还要知其所以然对吧
使用第三方自动构建服务
这个方案原理是利用能够访问外网的第三方服务根据我们的 Dockerfile 构建出镜像,然后我们去下载构建出来的镜像,因为这个镜像 FROM 自墙外的镜像,就变成我们间接下载了我们真正需要的镜像。
当然这个方案网上也有讲,但是用的是 Docker Hub 的镜像构建服务,今天试了试,网速表现一般~ 有兴趣的可以看看:传送门在此,感谢前辈的辛勤付出,为后来者提供了莫大的帮助!
所以(重点来了~赶紧记小抄!),这里以我今天发现的阿里云的自动构建服务特别好用,这里就用它来操作:
PS:目前阿里云容器镜像服务还处于试商用阶段,不仅免费
而且免费!最重要的速度快啊!(补加一个:还能自动检查讲真,我是不是应该向阿里云申请一笔广告费了~!)Dockerfile变化自动构建新版
首先你需要一些包含 FROM 上面提到镜像的 Dockerfile,这些文件不用太复杂,只需要 FROM 就可以了,例如:
FROM gcr.io/google_containers/kube-apiserver-amd64:v1.9.8
MAINTAINER lx0758 lx0758@qq.com
当然,你也可以 frok 我的仓库,里面已经包含了需要 Dockerfile 文件:
https://github.com/lx0758/automated-build
目录结构:
automated-build> tree /f
.
│  Dockerfile
│  README.md
└─gcr.io
    └─google_containers
        ├─etcd-amd64
        │      Dockerfile
        ├─kube-apiserver-amd64
        │      Dockerfile
        ├─kube-controller-manager-amd64
        │      Dockerfile
        ├─kube-scheduler-amd64
        │      Dockerfile
        ├─kube-proxy-amd64
        │      Dockerfile
        └─pause-amd64
               Dockerfile
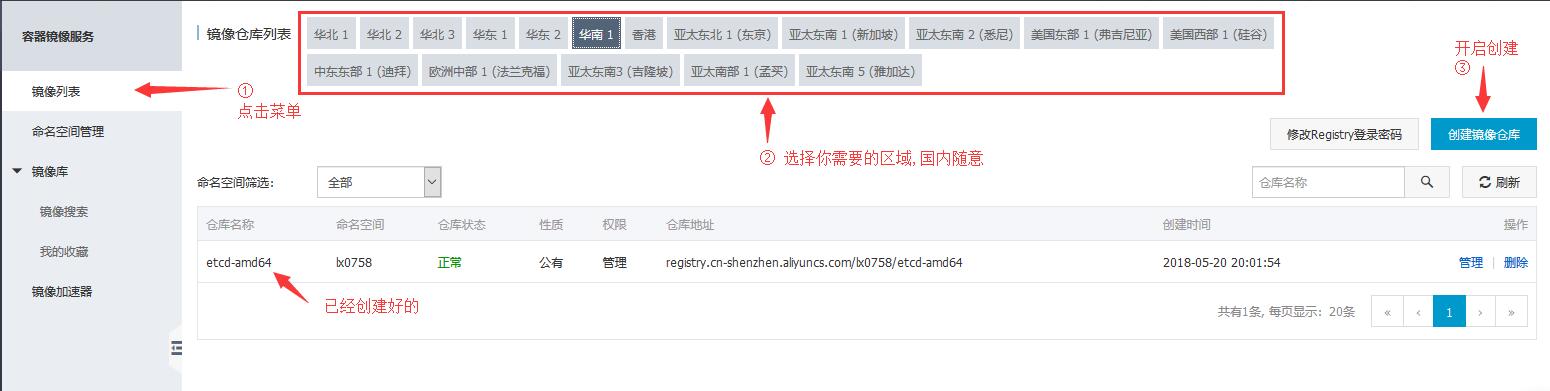
然后去 阿里云容器服务控制台 自行注册&登录,然后创建对应个数的仓库。直到构建出相应的镜像:
创建仓库:

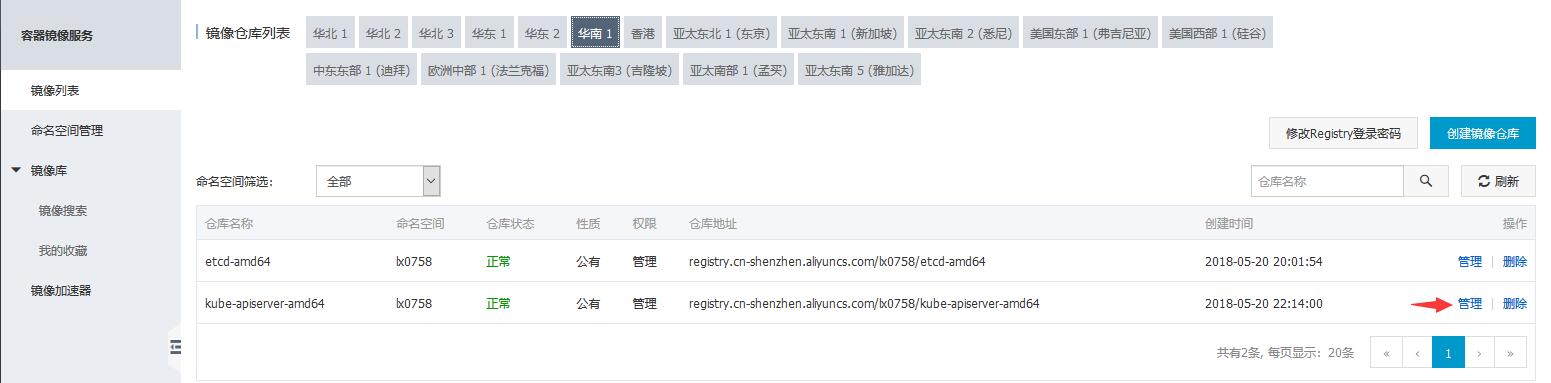
构建镜像:
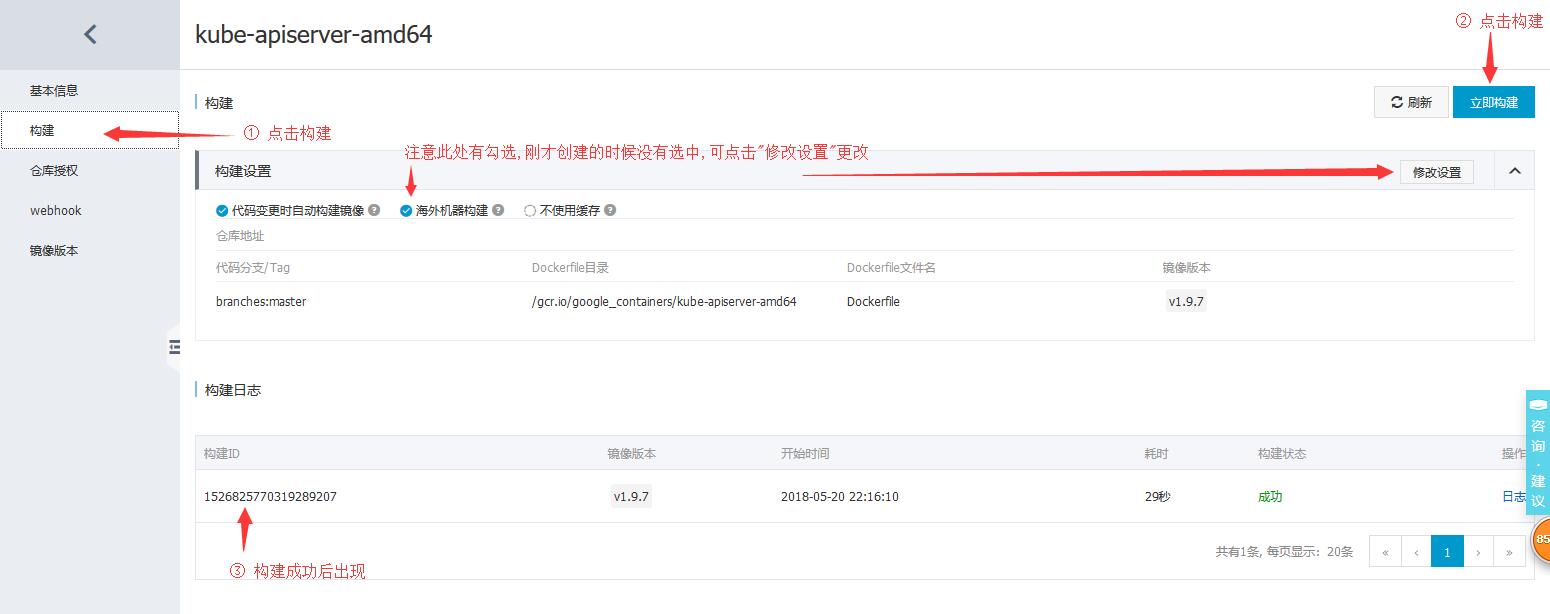
使用说明:

下拉镜像:
[root@localhost ~]# docker pull registry.cn-shenzhen.aliyuncs.com/lx0758/kube-apiserver-amd64:v1.9.8
Trying to pull repository registry.cn-shenzhen.aliyuncs.com/lx0758/kube-apiserver-amd64 ...
v1.9.8: Pulling from registry.cn-shenzhen.aliyuncs.com/lx0758/kube-apiserver-amd64
f70adabe43c0: Pull complete
11f418198626: Pull complete
Digest: sha256:e0904e02e874cc8d85ad3a92dbbea35eac317938aac79ff2bc2d8e163d97a557
Status: Downloaded newer image for registry.cn-shenzhen.aliyuncs.com/lx0758/kube-apiserver-amd64:v1.9.8
更改镜像 tag:
[root@localhost ~]# docker tag registry.cn-shenzhen.aliyuncs.com/lx0758/kube-apiserver-amd64:v1.9.8 gcr.io/google_containers/kube-apiserver-amd64:v1.9.8
[root@localhost ~]# docker images
REPOSITORY                                                      TAG                 IMAGE ID            CREATED             SIZE
gcr.io/google_containers/kube-apiserver-amd64                   v1.9.8              9df87dd51f23        12 minutes ago      212 MB
registry.cn-shenzhen.aliyuncs.com/lx0758/kube-apiserver-amd64   v1.9.8              9df87dd51f23        12 minutes ago      212 MB
这样,就成功 pull 下来一个需要的镜像,剩余几个大家重复上面的操作就可以了。
因为我在阿里云创建这几个仓库都是公开的,所以大家也许可以直接下拉:
#!/usr/bin/env bash
images=(
pause-amd64:3.0
etcd-amd64:3.1.10
kube-proxy-amd64:v1.9.8
kube-apiserver-amd64:v1.9.8
kube-scheduler-amd64:v1.9.8
kube-controller-manager-amd64:v1.9.8
)
for imageName in ${images[@]} ; do
    docker pull registry.cn-shenzhen.aliyuncs.com/lx0758/$imageName
    docker tag registry.cn-shenzhen.aliyuncs.com/lx0758/$imageName gcr.io/google_containers/$imageName
    docker rmi registry.cn-shenzhen.aliyuncs.com/lx0758/$imageName
done
OK,贴一下我目前的镜像:
[root@localhost ~]# docker images
REPOSITORY                                               TAG                 IMAGE ID            CREATED             SIZE
gcr.io/google_containers/pause-amd64                     3.0                 ec38a2020e09        4 hours ago         747 kB
gcr.io/google_containers/kube-apiserver-amd64            v1.9.8              33c677c83acc        4 hours ago         212 MB
gcr.io/google_containers/etcd-amd64                      3.1.10              1170a52f253a        4 hours ago         193 MB
gcr.io/google_containers/kube-proxy-amd64                v1.9.8              46e3fe19734f        4 hours ago         109 MB
gcr.io/google_containers/kube-scheduler-amd64            v1.9.8              ad84db7950b0        4 hours ago         62.9 MB
gcr.io/google_containers/kube-controller-manager-amd64   v1.9.8              5341036204e5        4 hours ago         139 MB
可以看到,pull 下来的镜像和修改 tag 的镜像各一个。到这里,我们需要的镜像就准备完毕了!
三、初始化 Master 节点
Kubelet 启动确认
为了保险,咱们启动一下
systemctl enable kubelet
systemctl restart kubelet
重置初始化
因为上个步骤我们已经调用了 kubeadm init ,所以直接再次调用的话会报错。需要先重置:
kubeadm reset
初始化
kubeadm init --kubernetes-version=1.9.8 --apiserver-advertise-address=192.168.56.100 --apiserver-cert-extra-sans=10.0.2.15,192.168.56.100 --pod-network-cidr=10.244.0.0/16
加入
--kubernetes-version=1.9.8是因为kubeadm初始化会去查询最新的k8s版本,但这个地址在墙外,楼主这里经常网络超时,就直接设置而不再查询。
加入
--apiserver-advertise-address=192.168.56.100是为了注册这个地址为ApiService绑定地址,然后我这个地址是虚拟机之间的通讯地址,这样Node才能通过这个地址join进来。
加入
--apiserver-cert-extra-sans=10.0.2.15,192.168.56.100是因为我虚拟机有多张网卡,k8s生成的鉴权证书时需要包含这些地址,才不会导致使用kubectl(10.0.2.15) 和Node join(192.168.56.100) 时出现 x509 错误。
因为我后面安装flannel网络,所以提前加上:
--pod-network-cidr=10.244.0.0/16。
激动人心的时刻到来了(真的,你不知道楼主这几天经历了些什么。。。):
[root@localhost ~]# kubeadm init --kubernetes-version=1.9.8 --apiserver-advertise-address=192.168.56.100 --apiserver-cert-extra-sans=10.0.2.15,192.168.56.100
[init] Using Kubernetes version: v1.9.8
[init] Using Authorization modes: [Node RBAC]
[preflight] Running pre-flight checks.
	[WARNING Hostname]: hostname "localhost.master" could not be reached
	[WARNING Hostname]: hostname "localhost.master" lookup localhost.master on 8.8.8.8:53: no such host
	[WARNING FileExisting-crictl]: crictl not found in system path
[preflight] Starting the kubelet service
[certificates] Generated ca certificate and key.
[certificates] Generated apiserver certificate and key.
[certificates] apiserver serving cert is signed for DNS names [localhost.master kubernetes kubernetes.default kubernetes.default.svc kubernetes.default.svc.cluster.local] and IPs [10.96.0.1 192.168.56.100 10.0.2.15 192.168.56.100]
[certificates] Generated apiserver-kubelet-client certificate and key.
[certificates] Generated sa key and public key.
[certificates] Generated front-proxy-ca certificate and key.
[certificates] Generated front-proxy-client certificate and key.
[certificates] Valid certificates and keys now exist in "/etc/kubernetes/pki"
[kubeconfig] Wrote KubeConfig file to disk: "admin.conf"
[kubeconfig] Wrote KubeConfig file to disk: "kubelet.conf"
[kubeconfig] Wrote KubeConfig file to disk: "controller-manager.conf"
[kubeconfig] Wrote KubeConfig file to disk: "scheduler.conf"
[controlplane] Wrote Static Pod manifest for component kube-apiserver to "/etc/kubernetes/manifests/kube-apiserver.yaml"
[controlplane] Wrote Static Pod manifest for component kube-controller-manager to "/etc/kubernetes/manifests/kube-controller-manager.yaml"
[controlplane] Wrote Static Pod manifest for component kube-scheduler to "/etc/kubernetes/manifests/kube-scheduler.yaml"
[etcd] Wrote Static Pod manifest for a local etcd instance to "/etc/kubernetes/manifests/etcd.yaml"
[init] Waiting for the kubelet to boot up the control plane as Static Pods from directory "/etc/kubernetes/manifests".
[init] This might take a minute or longer if the control plane images have to be pulled.
[apiclient] All control plane components are healthy after 33.004078 seconds
[uploadconfig] Storing the configuration used in ConfigMap "kubeadm-config" in the "kube-system" Namespace
[markmaster] Will mark node localhost.master as master by adding a label and a taint
[markmaster] Master localhost.master tainted and labelled with key/value: node-role.kubernetes.io/master=""
[bootstraptoken] Using token: 2bc1d8.896c082ff3e4d6e6
[bootstraptoken] Configured RBAC rules to allow Node Bootstrap tokens to post CSRs in order for nodes to get long term certificate credentials
[bootstraptoken] Configured RBAC rules to allow the csrapprover controller automatically approve CSRs from a Node Bootstrap Token
[bootstraptoken] Configured RBAC rules to allow certificate rotation for all node client certificates in the cluster
[bootstraptoken] Creating the "cluster-info" ConfigMap in the "kube-public" namespace
[addons] Applied essential addon: kube-dns
[addons] Applied essential addon: kube-proxy

Your Kubernetes master has initialized successfully!

To start using your cluster, you need to run the following as a regular user:

  mkdir -p $HOME/.kube
  sudo cp -i /etc/kubernetes/admin.conf $HOME/.kube/config
  sudo chown $(id -u):$(id -g) $HOME/.kube/config

You should now deploy a pod network to the cluster.
Run "kubectl apply -f [podnetwork].yaml" with one of the options listed at:
  https://kubernetes.io/docs/concepts/cluster-administration/addons/

You can now join any number of machines by running the following on each node
as root:

  kubeadm join --token 2bc1d8.896c082ff3e4d6e6 192.168.56.100:6443 --discovery-token-ca-cert-hash sha256:327b2050ded1cff763a20425d5df622abffb8d7148604b39e31c4c99b7e2110b
激动归激动,活得继续干~
注意上面输出的 join 命令行里面的 token 数据
kubeadm join --token 2bc1d8.896c082ff3e4d6e6 192.168.56.100:6443 --discovery-token-ca-cert-hash sha256:327b2050ded1cff763a20425d5df622abffb8d7148604b39e31c4c99b7e2110b
保存好,后面别的节点加入集群需要这个玩意~
初始化收尾
经过上面的步骤,k8s终于初始化完成了,但是现在 Master 节点的 kubectl 却还用不了:
[root@localhost ~]# kubectl get nodes
The connection to the server localhost:8080 was refused - did you specify the right host or port?
注意上面初始化完成的输出:
To start using your cluster, you need to run the following as a regular user:

  mkdir -p $HOME/.kube
  sudo cp -i /etc/kubernetes/admin.conf $HOME/.kube/config
  sudo chown $(id -u):$(id -g) $HOME/.kube/config

You should now deploy a pod network to the cluster.
Run "kubectl apply -f [podnetwork].yaml" with one of the options listed at:
  https://kubernetes.io/docs/concepts/cluster-administration/addons/
是滴,我们还需要执行一点收尾工作
[root@localhost ~]# mkdir -p $HOME/.kube
[root@localhost ~]# cp -i /etc/kubernetes/admin.conf $HOME/.kube/config
[root@localhost ~]# chown $(id -u):$(id -g) $HOME/.kube/config
再试试 kubectl 查看下节点:
[root@localhost ~]# kubectl get nodes
NAME               STATUS     ROLES     AGE       VERSION
localhost.master   NotReady   master    11m       v1.9.0
ok,初始化工作就算完成了!
设置 Master 为可调度节点
默认情况下,Master 不参与 Pod 调度,也就是说不会在 Master 节点上部署其他非系统 Pod。我们可以使用一下命令调整这个策略:
# 允许 Master 部署 Pod
kubectl taint nodes localhost.master node-role.kubernetes.io/master- --overwrite

# 禁止 Master 部署 Pod
kubectl taint nodes localhost.master node-role.kubernetes.io/master=:NoSchedule --overwrite

# 其中 localhost.master 是操作的节点名称
四、可能遇到的问题汇总
Docker和k8s的cgroup-driver配置不一致造成初始化失败
error: failed to run Kubelet: failed to create kubelet: misconfiguration: kubelet cgroup driver: "cgroupfs" is different from docker cgroup driver: "systemd"
Docker 的 cgroup-driver 查看:
[root@local ~]# docker info | grep Cgroup
Cgroup Driver: cgroupfs
修改 kubelet 启动配置文件,主要是将 --cgroup-driver 改为cgroupfs(确保和 /usr/lib/systemd/system/docker.service 的用户一致就可以了,如果一致则不需要修改!)
[root@localhost ~]# vim /etc/systemd/system/kubelet.service.d/10-kubeadm.conf
[Service]
Environment="KUBELET_KUBECONFIG_ARGS=--kubeconfig=/etc/kubernetes/kubelet.conf --require-kubeconfig=true"
Environment="KUBELET_SYSTEM_PODS_ARGS=--pod-manifest-path=/etc/kubernetes/manifests --allow-privileged=true"
Environment="KUBELET_NETWORK_ARGS=--network-plugin=cni --cni-conf-dir=/etc/cni/net.d --cni-bin-dir=/opt/cni/bin"
Environment="KUBELET_DNS_ARGS=--cluster-dns=10.96.0.10 --cluster-domain=cluster.local"
Environment="KUBELET_AUTHZ_ARGS=--authorization-mode=Webhook --client-ca-file=/etc/kubernetes/pki/ca.crt"
Environment="KUBELET_CADVISOR_ARGS=--cadvisor-port=0"
Environment="KUBELET_CGROUP_ARGS=--cgroup-driver=cgroupfs"
ExecStart=
ExecStart=/usr/bin/kubelet $KUBELET_KUBECONFIG_ARGS $KUBELET_SYSTEM_PODS_ARGS $KUBELET_NETWORK_ARGS $KUBELET_DNS_ARGS $KUBELET_AUTHZ_ARGS $KUBELET_CADVISOR_ARGS $KUBELET_CGROUP_ARGS $KUBELET_EXTRA_ARGS
重启 docker 或 kubelet
systemctl daemon-reload
systemctl enable kubelet
systemctl restart kubelet
初始化 Preflight 检查警告
在执行初始化过程中,可能会输出一些警告和错误
[preflight] Running pre-flight checks.
	[WARNING Hostname]: hostname "localhost.master" could not be reached
	[WARNING Hostname]: hostname "localhost.master" lookup localhost.master on 8.8.8.8:53: no such host
	[WARNING Service-Kubelet]: kubelet service is not enabled, please run 'systemctl enable kubelet.service'
	[WARNING Firewalld]: firewalld is active, please ensure ports [6443 10250] are open or your cluster may not function correctly
	[WARNING FileExisting-crictl]: crictl not found in system path
[preflight] Some fatal errors occurred:
	[ERROR Swap]: running with swap on is not supported. Please disable swap
[preflight] If you know what you are doing, you can make a check non-fatal with `--ignore-preflight-errors=...`
如上面所示,出现 WARNING 不会终止初始化过程,出现 ERROR 就会终止初始化过程。例如上面就抛出没有关闭 Swap 页面分区的错误停止了初始化。
如果确实需要忽略所有 preflight 警告和错误,可以在 kubeadm init 命令后加上 --ignore-preflight-errors=... 的参数。
初始化查询版本文件超时
[root@localhost ~]# kubeadm init --pod-network-cidr="10.24.0.0/16"
unable to get URL "https://dl.k8s.io/release/stable-1.9.txt": Get https://storage.googleapis.com/kubernetes-release/release/stable-1.9.txt: dial tcp 172.217.160.112:443: i/o timeout
指定版本重新执行命令(这个文件目前内容是 v1.9.8):
[root@localhost ~]# kubeadm init --kubernetes-version=1.9.8
[kubelet-check] It seems like the kubelet isn’t running or healthy.
初始化过程下拉镜像步骤之后出现:
···
[init] This might take a minute or longer if the control plane images have to be pulled.
[kubelet-check] It seems like the kubelet isn't running or healthy.
[kubelet-check] The HTTP call equal to 'curl -sSL http://localhost:10255/healthz' failed with error: Get http://localhost:10255/healthz: dial tcp [::1]:10255: getsockopt: connection refused.
[kubelet-check] It seems like the kubelet isn't running or healthy.
[kubelet-check] The HTTP call equal to 'curl -sSL http://localhost:10255/healthz' failed with error: Get http://localhost:10255/healthz: dial tcp [::1]:10255: getsockopt: connection refused.
[kubelet-check] It seems like the kubelet isn't running or healthy.
[kubelet-check] The HTTP call equal to 'curl -sSL http://localhost:10255/healthz' failed with error: Get http://localhost:10255/healthz: dial tcp [::1]:10255: getsockopt: connection refused.
[kubelet-check] It seems like the kubelet isn't running or healthy.
[kubelet-check] The HTTP call equal to 'curl -sSL http://localhost:10255/healthz/syncloop' failed with error: Get http://localhost:10255/healthz/syncloop: dial tcp [::1]:10255: getsockopt: connection refused.
[kubelet-check] It seems like the kubelet isn't running or healthy.
[kubelet-check] The HTTP call equal to 'curl -sSL http://localhost:10255/healthz/syncloop' failed with error: Get http://localhost:10255/healthz/syncloop: dial tcp [::1]:10255: getsockopt: connection refused.
[kubelet-check] It seems like the kubelet isn't running or healthy.
[kubelet-check] The HTTP call equal to 'curl -sSL http://localhost:10255/healthz/syncloop' failed with error: Get http://localhost:10255/healthz/syncloop: dial tcp [::1]:10255: getsockopt: connection refused.
[kubelet-check] It seems like the kubelet isn't running or healthy.
原因是 Docker 和 k8s 的 cgroup-driver 不一致造成的(不知道为什么没有预检查出来):
参考 5-1 【Docker和k8s的cgroup-driver配置不一致造成初始化失败】
iptables 拦截 bridge 网卡数据
初始化报错如下:
[init] Using Kubernetes version: v1.9.8
[init] Using Authorization modes: [Node RBAC]
[preflight] Running pre-flight checks.
	[WARNING Hostname]: hostname "localhost.master" could not be reached
	[WARNING Hostname]: hostname "localhost.master" lookup localhost.master on 8.8.8.8:53: no such host
	[WARNING FileExisting-crictl]: crictl not found in system path
[preflight] Some fatal errors occurred:
	[ERROR FileContent--proc-sys-net-bridge-bridge-nf-call-iptables]: /proc/sys/net/bridge/bridge-nf-call-iptables contents are not set to 1
[preflight] If you know what you are doing, you can make a check non-fatal with `--ignore-preflight-errors=...`
禁止 iptables 对 bridge 数据进行处理
cat <<EOF >  /etc/sysctl.d/k8s.conf
net.bridge.bridge-nf-call-ip6tables = 1
net.bridge.bridge-nf-call-iptables = 1
EOF
sysctl -p /etc/sysctl.d/k8s.conf
“按照”博客说的,还是初始化失败
尝试升级 Docker
emmm…最开始,我在部署 Docker 的时候,图方便就用 yum 安装的,版本是 1.13.2。然后在这期间试了很多次初始化(包括在国外服务器搭建,但环境一致),都是初始化失败…直到周一上班那天早上,无意间想准备一下 Docker 离线安装包,就去看了看 k8s v1.9.7 支持的 Docker 版本最高是 Docker-ce-17.03.x ,于是就卸载了原来的版本并安装了 17.03.2 版本的 Docker-ce —— 然后就初始化成功了…
虽然我也不确定是不是我用的 k8s 1.9.8 和 Docker 1.13.2 不兼容,但是大家要是遇到这种无解的情况,也可以尝试下升级 Docker。
最大的坑:防火墙
之前操作的时候,都没有关闭防火墙。直到我在写第四篇的时候,关掉了防火墙,才发现好多问题都是 Master 防火墙造成的。无语~
五、引用 & 鸣谢
- kubernetes(1.9.1部署)
- 安装部署 Kubernetes 集群
- 从零开始搭建Kubernetes集群
- kubeadm 搭建 kubernetes 集群
- kubeadm快速部署kubernetes1.6.7
- 阿里云快速部署Kubernetes - VPC环境
还有很多百度出来没摘抄的文章,感谢作者前辈们!